PRS and NRL matches will punish you for being a one-position shooter. I figured that out during six days of training at Blue Steel Ranch. Coming from 3-Gun, I thought I was solid. I could shoot prone with a bipod all day. But when Brian Whalen started putting us on barricades, off tripods, and out on the rim in field positions, my hit rate dropped. Prone accounted for maybe a quarter of what we actually trained. The rest had me draped over barricades, wedged into tank traps, kneeling behind simulated walls, and standing on a tripod with nothing but a squeeze bag between my rifle and a metal frame.
Positional shooting is the skill that separates the mid-pack from the top third in precision rifle competition. It’s not about pulling the trigger. It’s about building a stable platform from whatever surface the match director puts in front of you, then doing it fast enough to beat par time. The shooter who builds a solid barricade position in four seconds and fires a .4 MOA group beats the shooter who takes twelve seconds to get settled and shoots the same group.
This guide breaks down the core precision rifle positions you’ll face in PRS and NRL competition, the rear bag and barricade techniques that make them work, the gear that helps, and a practice progression for building speed without sacrificing stability. Most of what I know about this topic I learned at BSR and from watching my wife Laura compete in NRL matches. I’m still learning, but that’s exactly why this stuff is fresh.
If you’ve watched a PRS match, you’ve seen it. Shooters contorted around wooden barricades, draped over concrete tank traps, kneeling behind simulated walls with the rifle resting on a bag perched on a two-inch ledge. Every stage is a problem to solve: how do I build the most stable position from this support surface in the shortest time possible?
The PRS/NRL Competition Guide covers the format and scoring. This article goes deeper on the shooting positions themselves: the mechanics, the gear, and the technique that turns a wobbly hold into hits at 600 yards and beyond.
PRS stages draw from a handful of base positions. The barricade, the prop, or the stage design modifies them, but the underlying body mechanics stay the same.
Prone is your most stable position. Bipod out front, rear bag under the stock, body behind the rifle. In PRS, you’ll shoot prone less than you expect. Match directors know everyone can shoot prone, so they design stages that force you out of it. But when you do get a prone stage, it’s a chance to clean targets and build a points cushion.
The key detail most shooters overlook in prone: rear bag pressure. Your support hand should be on the rear bag, squeezing it to make fine elevation adjustments. The bipod handles the coarse positioning. The rear bag handles the precision. Brian pointed this out during training, and once I started watching for it, I saw it everywhere. Shooters trying to muscle the rifle up or down with their shoulder instead of using the bag. That creates tension in the system and the crosshair bounces.
Kneeling shows up on nearly every PRS stage that uses a barricade. One knee down, the other foot forward, rifle supported on the barricade or a bag sitting on the barricade surface. Your support-side elbow can brace against your forward knee for added stability if the barricade height allows it.
The mistake I made early on: treating kneeling like a standalone position. In 3-Gun, I’d taken kneeling shots unsupported all the time. In precision rifle, kneeling almost always pairs with a barricade or support surface. You’re not holding the rifle unsupported. You’re using the barricade as your platform and your kneeling stance as the way to get your body to the right height.
Sitting is underrated. Cross-legged or with one leg extended, sitting gets you lower than kneeling and gives you a wider base. Pair it with a tripod or a low barricade port and you can build a position that’s nearly as stable as prone. I use sitting for any barricade port that’s too low for kneeling and too high for prone. That 18–24 inch window where nothing else works well.
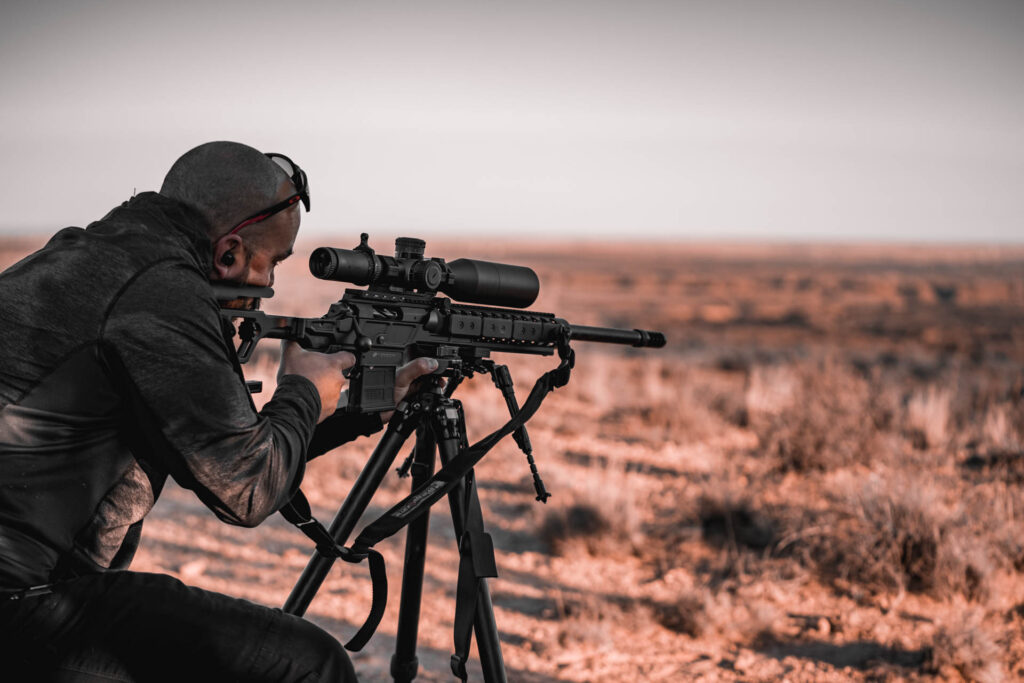
Standing is the least stable position and the one that separates the field at major matches. You’re fighting gravity, balance, and a much taller wobble zone. A tripod is almost mandatory for standing precision rifle positions. Without one, you’re holding 3–4 MOA of wobble. With a good tripod setup, you can cut that to 1–1.5 MOA, enough to hit a 2 MOA target at 400 yards if your trigger press is clean.
Rooftop positions put the rifle on top of a flat elevated surface, often the top edge of a barricade or a purpose-built platform. You’re typically standing or on your toes behind the support, laying the rifle flat on a bag on the surface. The challenge is vertical: your body is stretched upward, which makes it harder to load weight into the rifle. Getting your body as high as possible (standing on tiptoes, leaning into the barricade) helps transfer your weight through the rifle and into the support.
Tank traps are those X-shaped or angled props that force you into weird angles. You might be shooting through a V-notch, off a diagonal beam, or from underneath a crossbar. There’s no single “tank trap position.” The skill is reading the prop and figuring out how to create the most contact between your rifle, your bag, and the support surface. More contact points mean more stability.
Barricade shooting is the bread and butter of PRS positional work. Here’s what matters.
The principle is simple: get the rifle’s weight onto the barricade, not into your muscles. You’re not holding the rifle up. You’re resting it on the support surface and using your body weight to press it into that surface. Brian called this “loading the rifle” and it’s the single biggest technique concept in positional shooting. He hammered it into us at BSR until it became automatic.
To load the rifle, lean your body forward into the barricade. Your support hand pulls the rifle back into your shoulder while gravity and your body weight push the rifle down onto the support surface. The contact point between rifle and barricade should feel heavy, like the rifle is pinned there. If you can lift the rifle off the barricade without moving your body, you’re not loaded.
Shooting from both sides of a barricade is non-negotiable in PRS. Stages will force it. If you’re a right-handed shooter, your left-side barricade position will feel awkward at first. The rifle needs to move to your left shoulder, or you need to shoot right-handed from the left side, which means your support hand is doing different work.
I shoot right-handed from both sides and adjust my body position instead of switching shoulders. Brian showed us both methods at BSR. Some top shooters switch shoulders. Either approach works. What doesn’t work is avoiding left-side practice because it’s uncomfortable. You’ll face left-side barricade shots at every match.
Most new PRS shooters obsess over their bipod and their front rest. I did the same thing. The rear bag is where the real control lives, and I didn’t fully understand that until the PR1 class at BSR. Your front support (bipod, barricade, tripod) handles gross elevation and windage. Your rear bag handles the fine adjustments that put the crosshair on the target and keep it there through the trigger press.
Here’s how it works: your support hand squeezes the rear bag to raise the crosshair, releases pressure to lower it. Small changes in squeeze pressure translate to tiny elevation shifts at the reticle. On a 1 MOA target at 800 yards, the difference between a hit and a miss might be a quarter-inch of bag squeeze. That’s the level of control the rear bag gives you.
Bag fill matters. An overfilled bag is too firm to squeeze and won’t conform to the stock. An underfilled bag is too floppy and bottoms out. You want a bag that’s about 70–80% full: firm enough to support the rifle’s weight, soft enough to adjust with hand pressure.
I fill mine with plastic beads, not sand. Sand shifts too slowly and adds weight. A bag that weighs 12–16 oz and has some give when you squeeze it is about right.
Bag placement matters. The bag goes under the toe of the stock, behind the pistol grip. Not under the grip itself, not under the trigger guard. The farther back the bag sits, the more leverage you have for fine adjustments. If the bag is too far forward, small squeezes create big swings at the reticle. You want the relationship to feel linear: a little more squeeze, a little more elevation.
A tripod turns standing and kneeling from “hoping for hits” into repeatable shooting positions. The tripod setup for PRS article covers hardware selection. Here’s how to shoot from one.
Extend the tripod to full height. The rifle rests in the apex (where the legs meet the head) or on a saddle mounted to the head. Your support hand manages the rear bag while your firing hand runs the trigger. The key is loading weight forward into the tripod. Lean into it. A tripod that isn’t loaded will wobble under recoil and you’ll lose your position between shots.
Drop the tripod to its mid-height setting. One knee down, lean forward into the tripod the same way you’d lean into a barricade. Kneeling on a tripod is more stable than standing because your center of gravity is lower and you have three contact points with the ground (two feet and a knee) instead of two.
Collapse the tripod to its lowest setting. Sit cross-legged behind it. This is surprisingly stable, close to prone in some cases. The low center of gravity and wide sitting base give you a platform that resists wobble. I use this position for any stage that allows me to choose my own height and doesn’t force standing.
Not every support surface is a clean barricade with a flat ledge. PRS match directors will put you behind trees, rocks, vehicle hoods, tires, fence posts, and anything else that makes you think. The skill here is reading the surface and deciding where to make contact.
Trees: The rifle (or a bag on the rifle) rests against the trunk. You can shoot from either side. Wrap your support hand around the tree for added stability and pull the rifle into the bark. Rough bark helps. It grips better than a smooth surface.
Rocks and vehicle hoods: Lay a bag on the surface and treat it like a low barricade. The bag conforms to uneven surfaces better than the rifle alone. This is where a compact squeeze bag earns its weight. Toss it on a rock, set the rifle on it, load your weight forward, and shoot.
Tires and round objects: These are tricky because the surface curves. A rear bag or squeeze bag wedged into the curve gives you a flat(ish) platform. Without a bag, the rifle rolls off under recoil and you’re chasing your position after every shot.
The universal rule: more contact between rifle and support equals more stability. If you can get the forend, the magazine well, and the buttstock all touching something solid, you’ll hold tighter than if only the forend is resting on the surface. Think about how to build as many contact points as possible in the time you have.
You don’t need a truck full of bags to shoot positions well, but the right support gear eliminates variables.
Rear squeeze bag: This is your most-used positional aid. A small bag (roughly the size of a softball) filled with plastic beads that goes under the buttstock. The Game Changer by Armageddon Gear is the one I saw most at BSR and at Team Safari. It has a flat bottom that sits on surfaces and an angled top that cradles the stock. Other good options include the Wiebad Mini Fortune Cookie and the Mega Arm Bag.
Larger support bags: For barricade and prop work, a bigger bag like the Wiebad Tac Pad or Armageddon Gear Pint-Sized Game Changer gives you more surface area on awkward supports. These bags are too big for rear stock work but perfect for laying across a barricade ledge or stuffing into a V-notch.
Barricade stop: A small hook or block that mounts to your M-LOK or Picatinny handguard and catches the edge of the barricade to prevent forward slide. Simple, cheap, and genuinely useful.
Chassis system: A precision rifle chassis with a flat forend, adjustable cheek riser, and barricade-friendly surfaces makes positional work easier. Squared-off forends sit flat on barricades. Adjustable cheek risers let you maintain eye relief across positions. ARCA rails on the forend let you mount a tripod directly without adapter plates.
Tripod: Covered in detail in our tripod setup for PRS guide. A PRS tripod is a shooting support, not a camera accessory. Invest accordingly.
A clean position doesn’t matter if you build it after the par time expires. PRS stages typically give you 60–120 seconds to engage 8–12 targets from 2–4 positions. That’s roughly 15–30 seconds per position, including transitions. Subtract 2–3 seconds per shot for trigger press and bolt work, and you’ve got about 8–15 seconds to build each position.
Here’s how to get faster without cutting corners on stability.
Pre-stage the position in your head. During your walk-through, look at each position and decide where the rifle goes, where the bag goes, and where your body goes. Plan the exact sequence of movements. When the timer starts, you’re executing a rehearsed plan, not problem-solving.
Stage your gear. Bags should be accessible in the same spot every time. I run my rear bag tucked into my belt on my support side, something I picked up watching the more experienced shooters at BSR. Squeeze bags ride in a dump pouch. When I arrive at a position, my hands go to the same place for the same bag every time. Fumbling for gear under the clock is lost seconds you can’t get back.
Build from the ground up. Feet first, then knees or seat, then rifle placement, then bag adjustment, then shoot. Don’t try to place the rifle before your body is set. You’ll end up readjusting everything. Get your base stable, then build the shooting platform on top of it.
Dry fire the transition. At home, practice moving from standing to kneeling to sitting with a rifle. Time it. Your goal is smooth, not fast. Smooth becomes fast after enough reps. Jerky, rushed transitions waste time because you overshoot your position and have to readjust.
I’ve made every one of these. Some of them more than once.
Muscling the rifle instead of using the bag. Your shoulder is not an elevation knob. Shooters who push the rifle up with their body to get on target introduce tension into the system. The crosshair bounces instead of settling. Let the rear bag handle fine elevation. Your shoulder stays relaxed and consistent.
Not loading weight into the support. If you can lift the rifle off the barricade without shifting your body, you’re holding the rifle, not resting it. Lean forward. Get your weight pressing the rifle into the barricade surface. A loaded position absorbs recoil better and returns to zero between shots.
Rear bag too far forward. The bag goes under the toe of the stock, behind the pistol grip. If the bag sits under or near the trigger guard, small squeezes produce exaggerated swings at the reticle. Move the bag farther back for finer control.
Skipping left-side practice. You will shoot from both sides of a barricade at every PRS match. Shooters who only practice their dominant side lose time and hits when the stage forces a switch. Train both sides until the non-dominant side feels boring, not awkward.
Building the shooting platform before the body position. Placing the rifle on the barricade before your feet, knees, and hips are set means you’ll readjust everything once your body settles. Build from the ground up: base first, then rifle, then bag, then shoot.
Jumping to speed before building consistency. Rushing positional drills with a shot timer before you can build the same position the same way every rep trains you to be fast and wrong. Consistency first. Speed follows naturally once the mechanics are automatic.
The worst thing you can do is jump straight into timed positional drills from a barricade at 800 yards. I wanted to do exactly that on day one at BSR. Brian made us slow down, and he was right. Start with the fundamentals and add complexity one layer at a time.
Week 1–2: Rear bag work from prone. Shoot groups at 100–300 yards from prone with a bipod and rear bag. Focus entirely on rear bag technique: consistent squeeze, smooth elevation adjustments, maintaining pressure through the trigger press. If your groups tighten by 20% compared to shooting without a rear bag, your technique is working.
Week 3–4: Single barricade position, no time pressure. Pick one position. Kneeling on a barricade is a good starting point. Build the position, get loaded, shoot a 5-round group. Break position, rebuild, shoot another group. Focus on building the same position the same way every time. Consistency before speed.
Week 5–6: Add a second position and transitions. Now you’re moving between two positions on the same barricade: kneeling and standing, or left side and right side. Practice the transition. Time starts when you break the first position and stops when your first shot from the second position goes downrange.
Week 7–8: Add par times and multiple targets. Set a par time that’s generous, maybe 90 seconds for 6 targets from 2 positions. Shoot the drill. If you clean it, cut the par time by 10 seconds. Keep cutting until you’re missing. That’s your current speed limit. Train there until the hits come back, then cut again.
Ongoing: Simulate match conditions. Set up barricade stages in practice that mirror what you’ll see at matches. Vary the props, the distances, the positions, and the par times. The more varied your practice, the faster you’ll be at reading an unfamiliar stage and building a solid position.
Prone with a bipod and rear bag is the most stable. After that, sitting with a tripod or low barricade support comes closest to prone-level stability. Kneeling is moderately stable when paired with a barricade, and standing is the least stable position even with tripod support. The goal is to use the most stable position the stage allows. Match directors know this, which is why they design stages to force you out of prone.
Yes. A rear bag is not optional. It’s foundational equipment. Every competitive PRS shooter runs a rear bag for fine elevation control on positional stages. You can get by without specialized barricade bags early on, but skipping the rear bag costs you hits from the first stage. Start with a basic squeeze bag in the $30–$50 range and upgrade once you know what shape and fill works for your shooting style.
Use a doorframe, a fence post, a vehicle, or any vertical surface with a ledge. The barricade itself is just a support structure. Any surface that lets you rest the rifle with a bag and practice loading weight into the support builds the same skills. I did most of my early positional dry fire practice on the doorframe between my garage and my house.
That’s a personal choice with no single right answer. Switching shoulders gives you a better position relative to the barricade but requires training your non-dominant eye and trigger hand. Staying on your dominant shoulder means adjusting your body position around the barricade, which can be slower. Most PRS shooters stay on their dominant shoulder and adjust body position. Try both in practice and commit to whichever you shoot more accurately with under time pressure.
Plastic beads (often sold as poly pellets) are the most common fill for PRS bags. They’re lightweight, shift quickly when you squeeze, and don’t absorb moisture. Sand is heavier and shifts more slowly, which makes fine adjustments sluggish. Some shooters mix beads and sand for a balance of weight and responsiveness. Fill the bag to about 70–80% capacity: firm enough to support the rifle but soft enough to conform to the stock and the support surface.
At minimum, one rear squeeze bag. That’s enough to compete. Most experienced shooters carry two: a rear squeeze bag and a larger support bag for barricade and prop work. Some carry three or more specialized bags for different stage types. Start with one good rear bag, shoot a few matches, and figure out what situations make you wish you had a second bag. Then buy one that solves that specific problem.
Every PRS shooter spends time and money building a rifle that shoots sub-MOA groups from a bench. The rifle is only half the system. Your positions (how you build them, how fast you build them, and how stable they are) determine whether that sub-MOA potential translates to hits on steel at a match.
Start with rear bag fundamentals. Get your bipod and bag work dialed in prone until it’s automatic. Then move to a single barricade position and build consistency. Add positions, add transitions, add time pressure. The progression is simple. It just takes reps.
If you’re building your first PRS rifle, check our precision rifle chassis guide for platforms that make positional work easier. And if you haven’t read the PRS/NRL Competition Guide, start there for the full picture of what competition looks like before you start stacking gear.
I’m still building these skills. Every match and training session adds reps. But even coming from 3-Gun with zero precision rifle match experience, the progression works if you follow it. The shooter who builds a solid position in five seconds and sends clean hits will always beat the shooter who takes fifteen seconds to build a perfect position and runs out of time. Speed and stability aren’t opposites. They’re the same skill at different levels of practice.
Active competitor across 3-Gun, PCC, and precision rifle, Dustin has been deep in the multigun world since the Minnesota 3 Gun Group days. He joined JP Enterprises as a rifle tech in 2015 and grew into marketing and team representation, giving him a ground-level understanding of how competition drives rifle design. Along the way, he's represented brands like Remington, Burris Optics, and Real Avid — building a career that spans the workbench, the marketing side, and the firing line. As an Action Gunner co-founder, he's been behind the camera and on the stage since day one.
Gear we've actually tested, from brands we trust. Competitive pricing with fast shipping.
Shop Now