Every article on the internet teaches you how to hold a pistol. This one teaches you how to build a grip that runs fast splits and tracks a red dot back to the same spot, shot after shot, under match pressure.
In self-defense shooting, your grip needs to be “good enough.” You draw, you fire, you stop the threat. In competition, grip is the foundation that determines your split times, your transitions, and how fast that dot comes back to where you need it. The difference between a C-class and an A-class shooter often starts right here, not with trigger control or movement, but with how they hold the gun.
I spent the early years of my competition career consuming everything I could find on shooting fundamentals. The material hammered on dryfire: smooth trigger press, don’t disturb the sights, build consistency through repetition. And dryfire matters. But what I missed was how important live fire was in that equation. Recoil changes things fast. You can’t possibly know what to work on in dry fire without a substantial amount of rounds and time behind the gun.
My real breakthrough came when I made that realization. That’s where I actually built my grip. Initial dryfire taught me basic familiarization. Live fire taught me how to manage the gun and how I needed to hold it. Dryfire after that became deliberate and meaningful, and let me solidify it all.
That’s the approach behind this guide. Not textbook theory. Technique I’ve developed and refined across 10+ years of competing in USPSA, 3-Gun, Tactical Games, and 2-Gun, running platforms from polymer-framed strikers to aluminum-frame 2011s. If you’re looking for a complete pistol shooting fundamentals overview, we have that. This guide goes deeper on the single skill that everything else builds on.
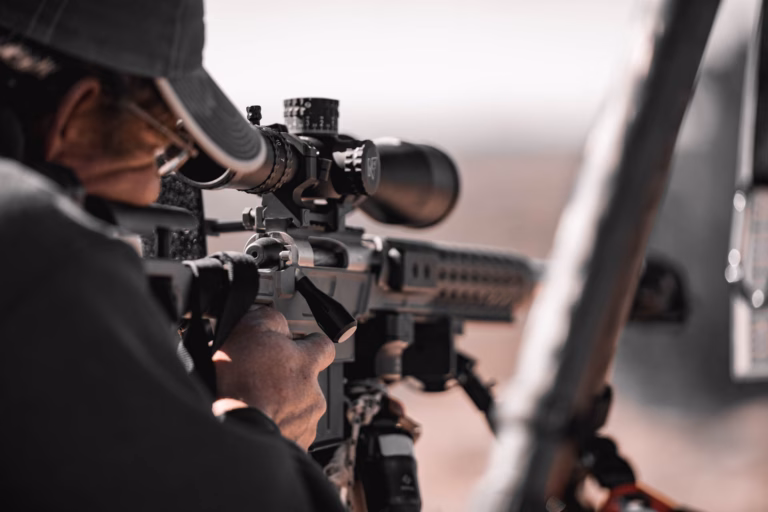
What is the competition thumbs-forward grip? The thumbs-forward grip is the dominant two-handed pistol grip in competitive shooting. Both thumbs point forward along the frame, the support hand wraps high with maximum surface contact, and the shooting hand seats deep into the backstrap. This grip maximizes recoil control and allows the fastest return to target between shots.
The thumbs-forward grip won because it solves a physics problem. Recoil drives the muzzle up. You need as much surface area as possible clamping the gun to resist that rotation. The older thumb-lock grip (where your support thumb wraps over the shooting thumb) and the thumb-over grip (where the shooting thumb curls down) both leave exposed grip surface. Exposed grip surface is wasted leverage.
With thumbs forward, the support hand fills nearly every gap on the grip. Your support thumb runs along the frame below the slide, creating forward pressure that helps drive the muzzle back down. Your shooting hand thumb rests on top of the support thumb or sits slightly relaxed alongside it, depending on the grip size of the gun. Neither thumb interferes with the slide’s travel.
The key difference from what most basic pistol classes teach: competition grip is aggressive. You’re not just holding the gun. You’re clamping it so the only direction it can move under recoil is straight back into your hands, where your locked wrists absorb the energy and the gun returns to your natural point of aim.
What you need before starting:
This is the process I use every time I pick up a pistol, whether it’s the first draw of the day or the 200th. The goal is making this grip identical every single time.
Push the web of your hand as high as possible into the backstrap and beavertail. You want zero daylight between the top of your hand and the bottom of the slide. The higher your hand sits, the closer it is to the bore axis, and the less leverage recoil has to flip the muzzle up.
Your trigger finger should reach the trigger with the pad of the fingertip, with no lateral pressure pushing the gun sideways. If you have to reach or curl excessively, the grip size may not be right for your hand. This is where swappable backstraps earn their keep.
Your support hand’s job is to fill every gap the shooting hand leaves exposed. Cant the support hand wrist slightly downward, then wrap the fingers over the shooting hand’s fingers (not interlocking, just overlapping). The support hand’s palm heel should press firmly into the exposed grip panel on the opposite side.
Your support thumb goes forward along the frame, below the slide. My support thumb is always forward and tight against the frame, regardless of what platform I’m running. My firing thumb rests on top of it without interfering with the slide, or sits slightly relaxed depending on the grip size.
Here’s where most grip advice falls apart. You’ve probably seen the “60/40 support hand to shooting hand” or “70/30” pressure recommendations. I don’t think in percentages. Feel is subjective, and assigning a ratio to something you can’t measure doesn’t help you on the range.
My approach is simpler: I hold the gun tight enough that my grip doesn’t shift in either hand under recoil, and I keep my dominant hand relaxed enough that it doesn’t introduce tension into my trigger finger. That’s it.
The fastest way to calibrate this: load a magazine, stand in front of a chest plate up close, and run through the mag focusing on what hand pressure and position you end up with to maintain control. Then work backwards from there to figure out the cues that let you repeat that grip every time you draw.
Once your hands are set and pressure is applied, lock your wrists. Wrist lock is what prevents the gun from flipping under recoil. Think of your arms as a frame: the grip controls left-right, the wrists control up-down. Locked wrists combined with solid grip pressure mean the gun goes straight back into your hands and returns to the same spot.
This is what “driving the gun” means in practice. You’re not muscling the muzzle down. You’re building a platform that’s rigid enough that the gun returns on its own.
Grip the gun hard enough that it doesn’t move in your hands under recoil. Keep your shooting hand relaxed enough that you can work the trigger cleanly without adding lateral pressure. That’s the honest answer, and it’s more useful than any percentage.
The “60/40” and “70/30” recommendations that float around the internet are trying to solve a real problem: most new shooters either grip too loosely (the gun shifts in their hands) or too tightly (every muscle in their forearms tenses up and the trigger press goes sideways). But assigning a ratio to subjective feel doesn’t give you anything actionable. You can’t measure 60% grip pressure on the range.
What you can do is test. Load a magazine and shoot a plate rack or a chest-sized target up close, focusing on nothing but control. Find the pressure that keeps the gun from shifting and the muzzle from flipping excessively. Then deliberately add more pressure and notice when your splits actually slow down or your shots start pulling. There’s a threshold where more grip stops helping and starts hurting. Find it.
Generally, tighter grip allows faster splits with better control. But too tight slows your splits down and pulls shots. The support hand should be doing most of the clamping work. The shooting hand provides the frame and keeps the trigger finger free to do its job.
If you’re coming from a dry fire practice background (and you should be), grip pressure is one of the things that changes most between dry fire and live fire. In dry fire, any grip works because there’s no recoil to fight. On the range, you’ll find out fast whether your grip is actually solid.
This is where most grip guides end and this one keeps going. If you only shoot one pistol, you can dial your grip in and leave it alone. But if you compete across divisions or switch platforms, your grip needs to adapt.
I’ve competed with polymer-framed strikers (P320, Glock platform), aluminum-frame SAO guns (OA Defense 2311 Pro Elite, Atlas Nemesis), and steel-frame 1911s (Sig 1911 Max Michel). Grip size, grip angle, and frame texture all influence how I operate each gun. The foundational principle stays the same: apply appropriate positioning and pressure to maintain control without actively fighting the recoil. Let the gun come back to your natural point of aim. But the details shift.
Polymer strikers (P320, Glock): Wider grips, different backstrap angles, and some flex in the polymer frame. You may need to grip harder because the frame has some give that a metal-frame gun doesn’t. Swappable backstraps matter here. Find the one that fills out your hand completely before worrying about anything else.
Aluminum-frame 2011 (OA 2311 Pro Elite): Narrower grip, rigid frame, and the added weight of a metal frame helps absorb recoil. At 33 oz loaded, the gun does some of the work for you. My 2311’s factory grip configuration doesn’t need anything extra for my hands.
Steel-frame 1911 (Sig Max Michel): Heavy, narrow, different bore axis. The weight is an asset for recoil management, but the narrow grip means small hand position changes have a bigger effect. Precision in hand placement matters more on these.
The cross-platform lesson: when I ran the Mantis X10 Elite across six different platforms, it exposed grip inconsistencies I didn’t know I had. Each gun wanted slightly different hand placement for optimal results, and I’d been unconsciously transferring habits from one platform to another without adjusting.
Gear Note If you compete with multiple platforms, the Mantis X10 Elite is useful for diagnosing grip inconsistencies across guns. It gives you objective data on what your hands are doing that you can’t feel in real time. I documented my experience in our Mantis X10 Elite review.
I wish I had started shooting with a red dot. It gives you immediate, obvious feedback on what the gun is doing through every phase of the trigger press. Too much grip pressure and you can see the dot tracking in one direction. Too little and the dot bounces around after each shot.
With iron sights, small grip errors show up as groups that open up and you’re left guessing why. With a dot, you can watch the problem happen in real time.
This matters because Carry Optics is now the largest division in USPSA, and most new competitors are starting with a red dot on a striker-fired gun. If that’s you, your grip directly controls your dot’s behavior. Consistent grip means the dot returns to the same spot after every shot. Inconsistent grip means you’re hunting for the dot instead of pressing the trigger when it arrives.
Support hand pressure has a visible effect on the dot return path. If your support hand is clamped properly and your wrists are locked, the dot tracks straight up and comes straight back down. If the support hand is weak or inconsistent, the dot wanders laterally and you’re chasing it. Pay attention to this in live fire, because it’s the fastest diagnostic tool you have for sight alignment under recoil.
Before you stipple anything, start with the ergonomics of the grip itself. Most modern pistols ship with swappable backstraps and sometimes side panels. Find the combination that fills out your hands and gives you consistent hand placement. This matters more than any texture modification.
Once your hands sit where they need to be, then consider adding grip. Stippling, grip tape (TALON Grips PRO, hockey tape, skateboard tape), and aftermarket grip panels all serve the same purpose: they keep your hands from shifting under recoil or sweat. But they’re a secondary fix. If your hand placement is wrong, sticky grips just lock your hands in the wrong position more firmly.
My honest assessment across platforms: the factory configuration on my OA 2311 Pro Elite doesn’t need anything extra. The texture and grip shape work for my hands as-is. My Staccato P, on the other hand, has smoother grip panels without raised features or gas pedals to index off of. That gun would benefit from additional stippling or grip tape to give my hands a consistent reference point on the draw.
Thumb ledges and gas pedals give your support thumb a shelf to press against, which some shooters find helps with consistent thumb placement. I run them where the gun offers them and don’t chase aftermarket options where it doesn’t. They’re a “nice to have,” not a requirement.
The honest bottom line: modifications help if your grip fundamentals are solid. They don’t fix a bad grip. Get the basics right first, then fine-tune with texture and accessories where you actually need them. Don’t fall into the trap of common pistol shooting mistakes like trying to buy your way past a technique problem.
After 10+ years at matches, these are the grip errors I see most often, especially from newer competitors.
Not gripping hard enough. The gun visibly shifts in their hands under recoil. Every shot resets the grip slightly, which means every shot has a slightly different point of aim. You can spot this from behind the shooter: the gun moves in their hands, not just upward from recoil.
The fix is straightforward. Grip harder with the support hand until the gun stays planted.
Overgripping in anticipation of recoil. This is the opposite problem, and it’s sneaky. The shooter clamps down on the gun before the shot fires because they’re bracing for the bang. That tension causes the muzzle to dip before the shot breaks, throwing rounds low.
If you’re consistently hitting low on target and your sights were aligned, this is probably why. The fix is mental as much as physical: your grip should be consistent before, during, and after the shot. Not tighter right before.
Regripping between shots. The shooter establishes a decent grip on the draw, fires one shot, and then subtly readjusts before the next shot. This shows up as inconsistent splits. Your first split might be fast, but your second and third slow down because you’re regripping instead of pressing the trigger. The fix: commit to your initial grip. If it’s not right, fix it during dry fire practice, not mid-string.
Changing grip under match stress. Practice grip and match grip become two different things when the timer beeps. Stress makes shooters either clench harder (inducing trigger finger tension) or go loose (losing recoil control). The only fix is running more matches. You can’t simulate match stress on a practice range.
Support hand thumbs riding the slide. This is more common on guns with narrow slides. The support hand thumb drifts upward and contacts the moving slide, creating drag that can slow the cycling or cause malfunctions. Keep that thumb below the slide, running along the frame.
I don’t do dedicated grip strength training. I do deadlifts and other barbell work in my regular training, and that’s been enough. It’s also worth considering that many accomplished female shooters do no grip-specific training at all but run pistols quickly and accurately. You don’t need to be able to crush a skull with your grip. You need to know how to apply it properly.
That said, here’s what does help:
Dry fire presentation drills. Run 50 presentations from the holster focusing on nothing but establishing the same grip every single rep. Don’t press the trigger. Just draw, establish grip, verify hand placement, and holster. This is how you build the muscle memory that makes your match grip automatic.
Live fire validation. After a dry fire session, take the same drill to the range. Draw and fire one shot. Check your grip. Is it the same as your dry fire grip? If not, figure out what changed under recoil and fix it. Then extend to pairs and Bill Drills.
The fatigue test. This one matters especially for Tactical Games competitors. Do pushups or farmer carries until your hands are shaking, then pick up the pistol and shoot. Every flaw in your grip fundamentals gets exaggerated under fatigue. You’ll start applying pressure in all the wrong places (fingers instead of palm heels) and pulling shots.
In Tactical Games specifically, because it’s cadence shooting, you’re sometimes better off loosening your grip from what you’d normally run and focusing on single precise shots. A miss costs 10 seconds. Taking one second per shot is more than appropriate.
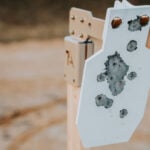
Range drills for grip diagnostics. Run a plate rack or a series of close targets and pay attention to two things: does the dot return to the same spot every shot, and are your splits consistent? If the dot wanders or your splits vary by more than .05 seconds, your grip isn’t repeating. Go back to the fundamentals.
The thumbs-forward grip is the standard for competitive shooting. Both thumbs point forward along the frame, the support hand wraps as high as possible with maximum surface contact, and the shooting hand seats deep into the backstrap. This grip provides the most recoil control and fastest return to target. It’s what the vast majority of competitive shooters at every level use across USPSA, 3-Gun, and other action shooting disciplines.
Grip hard enough that the gun doesn’t shift in your hands under recoil, but keep your shooting hand relaxed enough to work the trigger cleanly. The support hand does most of the clamping. Forget percentage-based advice like “60/40.” Instead, find your personal threshold on the range: the point where adding more grip pressure stops helping your splits and starts pulling your shots.
Technique matters more than raw strength. Many accomplished female competitors run pistols quickly and accurately without dedicated grip training. That said, adequate grip strength prevents the gun from shifting in your hands. General fitness training (deadlifts, farmer carries) builds sufficient grip strength for most shooters. Focus on learning how to apply pressure correctly before chasing grip strength.
Start with the grip’s ergonomics first. Find the right backstrap and panel combination that fills out your hands and gives consistent placement. If your hands still slip under recoil or in sweaty conditions, stippling or grip tape helps. Some factory grip textures are aggressive enough without modification. My OA 2311 Pro Elite doesn’t need anything extra, while my Staccato P would benefit from additional texture.
The thumbs-forward grip positions both thumbs pointing forward along the frame, below the slide. The support hand wraps high around the grip, filling every gap the shooting hand leaves exposed. Competition shooters use it because it maximizes the surface area clamping the gun, which provides the best recoil control and fastest dot or sight return. Older thumb-lock and thumb-over grips leave exposed grip surface that wastes leverage.
Use the smallest backstrap option available and consider guns with narrower grip profiles. Your fundamental technique doesn’t change: seat the web of your hand high, wrap the support hand to fill gaps, and apply pressure through the palm heels. Smaller hands may not fully wrap around wider grips like the P320’s, which makes support hand placement even more critical. Look at single-stack or 1911/2011 platforms that offer narrower profiles.
The fundamental grip technique stays the same, but a red dot makes grip errors more visible. With irons, small grip inconsistencies show up as opened groups. With a dot, you can watch the dot wander or fail to return to the same spot, giving you real-time feedback on grip pressure and hand placement. Many shooters find they refine their grip faster after switching to a dot because the feedback loop is immediate.
In wet conditions, grip tape or stippling becomes more important because smooth factory surfaces lose traction. Keep a small towel or rag on your belt to dry your hands between stages. In cold conditions, grip degrades because your hands lose dexterity and sensation. Thin shooting gloves help some shooters, though they change the feel of the trigger. The more important fix is ensuring your grip fundamentals are strong enough that reduced hand sensitivity doesn’t change your hand placement.
Active competitor since 2014 across USPSA, 3-Gun, The Tactical Games, and PCSL 2-Gun. Shawn founded Action Gunner in 2016 with the belief that the competitive shooting community deserved honest, match-tested content from people who actually shoot matches — not rewritten press releases. When he's not writing, he's building rifles, running stages, or wrenching on guns in the event trailer.
Gear we've actually tested, from brands we trust. Competitive pricing with fast shipping.
Shop Now